
Azure Active Directory App Only Authentication with OfficeDev PnP PowerShell
Notice: this is the second post in a series of 2. See http://www.erwinmcm.com/azure-active-directory-authentication-with-officedev-pnp-powershell for the first post).
If you read the first post and managed to connect succesfully to SharePoint Online with your Azure AD application client ID, you have noticed that you are prompted for a username and password. While that might be okay for incidental use, if you want to automate and/or schedule a PowerShell script this is obviously not a solution.
In this post I will go through the steps to setup a Azure AD application that will allow you to authenticate with a certificate.
Setup the app in your Azure AD
- Navigate to https://manage.windowsazure.com and open your Azure AD.
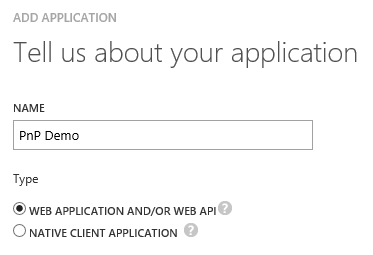
- Select the “Applications” tab and click “Add” in the bottom of the page.
- Select “Add an application my organization is developing.
- Pick a name and select “WEB APPLICATION AND/OR WEB API”:
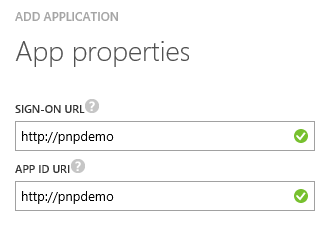
- Navigate to step 2 of the wizard and enter a URI in both fields. This can be any URI, it doesn’t have to point to an existing site:
- Confirm and after a few seconds you will see a confirmation screen.
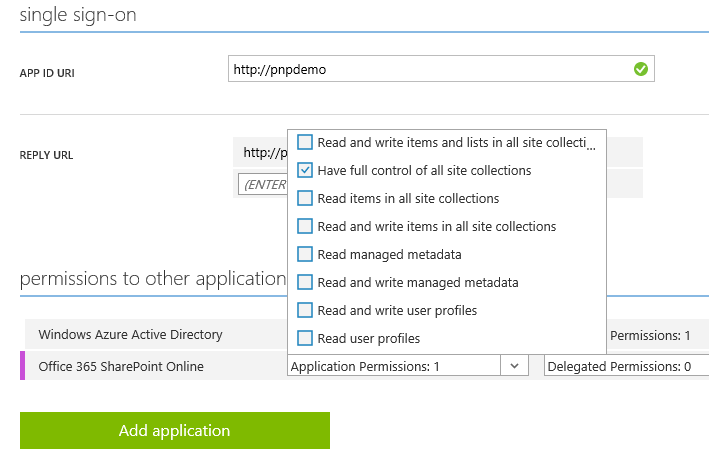
- Navigate to the “Configuration” tab:

- Click the big green “Add Application” button.
- Select “Office 365 SharePoint Online” and confirm your selection.
- From the application permissions drop down, pick the appropriate rights and click SAVE in the bottom of the page.
- From the toolbar in the bottom, select “MANAGE MANIFEST” and “Download Manifest”:

Creating the certificate
We are now going to create a self signed certificate. Of course you can also use a commercial certificate if you want. You might be tempted to use the New-SelfSignedCertificate cmdlet that is available since Windows 8 and Windows Server 2012 but I found that it does not create a certificate that is suitable for our scenario. So we have to fall back to makecert.exe.
Check out the following PowerShell Script to create a self signed certificate and export the CER and PFX files:
$certroot = "c:\temp"
$certname = "PnPDemoCertificate"
$password = read-host "Enter certificate password" -AsSecureString
$startdate = Get-Date
$enddate = $startdate.AddYears(2)
.\makecert.exe -r -pe -n "CN=$certname" -b ($startdate.ToString("MM/dd/yyyy")) -e ($enddate.ToString("MM/dd/yyyy")) -ss my -len 2048
$cert = Get-ChildItem Cert:\CurrentUser\My | ? {$_.Subject -eq "CN=$certname"}
Export-Certificate -Type CERT -FilePath "$certroot\$certname.cer" -Cert $cert -Force
Export-PfxCertificate -FilePath "$certroot\$certname.pfx" -Cert $cert -Password $password -Force
The script will generate a certicate that is valid from the day you run the script and is valid for 2 years. Take notice of the location of both the PFX and CER files.
Modifying the manifest file
Locate the downloaded manifest file (usually named .json) on your local machine and edit the file with your prefered text editor Now switch back to PowerShell with the OfficeDev PnP PowerShell Cmdlets installed and enter:
Get-SPOAzureADManifestKeyCredentials -CertPath <path to your exported CER file> | clip
This will copy a string which is alike the following to your clipboard:
"keyCredentials": [
{
"customKeyIdentifier": "6TRVNt0SKiuAqujJPdZlakce7ok=",
"keyId": "1b0bc0e2-1ef6-4003-8ef4-806934fedd5f",
"type": "AsymmetricX509Cert",
"usage": "Verify",
"value": "MIIDDjCCAfqgAwIBAgIQ2tA<shortened>ags6eS2vjd62ZRa"
}
],
I shortened the value property, the actual version on your clipboard it is a much larger value.
In the manifest file that you opened earlier, find the line that starts with “keyCredentials” and replace the full line, including the beginning “keyCredentials”, with the contents of your clipboard.
Save the file, and upload it using the “Upload Manifest” menu option in “MANAGE MANIFEST”:
Connecting with the cmdlets
On the Azure Application configuration page, locate the CLIENT ID value and copy it to your clipboard:

Open PowerShell, and enter:
Connect-PnPOnline -Url "https://<yourtenant>.sharepoint.com/sites/<yoursite>" -ClientId "<theclientidyoucopied>" -CertificatePath "<path to your PFX file>" -CertificatePassword (Read-Host "Enter Password" -AsSecureString) -Tenant <name of your tenant, e.g. yourtenant.onmicrosoft.com>
So in the case of the configuration above, the command would look like:
Connect-PnPOnline -Url "https://<yourtenant>.sharepoint.com/sites/<yoursite>" -ClientId "c5013a05-8a03-4599-7d1f0f4170cc" -CertificatePath "c:\temp\PnPDemoCertificate.pfx" -CertificatePassword (Read-Host "Enter Password" -AsSecureString) -Tenant erwinmcm.com
Press enter. PowerShell will ask you to enter the password to the PFX file.
If all went okay, will you have a valid ClientContext and you can perform tasks with the cmdlets and the client context that fit within the permissions granted to the application. Try for instance Get-PnPList to retrieve all lists in the site.
But… I still have to enter a password?
Yes, but there is a solution to that.
- Navigate to your Credential Manager in your Windows Control Panel.
- Click “Windows Credentials”
- Click “Add a Generic Credential”:
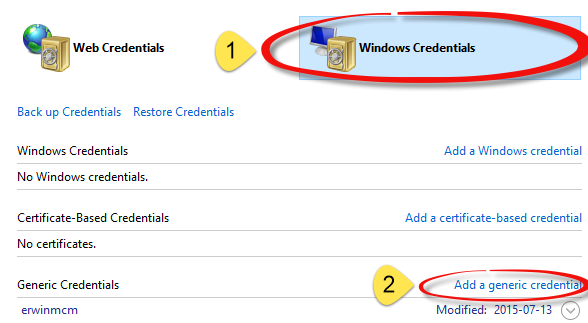
- Pick an easy to remember name and enter the information for instance like:
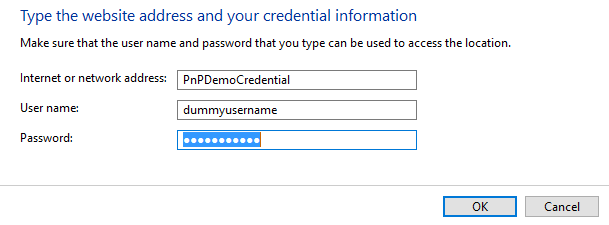
- The username is not important, but in the password field you should enter the password you picked when exporting the certificates.
- Click OK to store the entry.
Now you can connect with Connect-PnPOnline as shown in the following script:
$credential = Get-PnPStoredCredential -Name "<yourlabel>" -Type PSCredential
Connect-PnPOnline -Url https://<yourtenant>.sharepoint.com/sites/<yoursite> -ClientId "<theclientidyoucopied>" -CertificatePath "<path to your PFX file>" -CertificatePassword $credential.Password -Tenant <name of your tenant, e.g. yourtenant.onmicrosoft.com>
So in the case of the configuration above, the command would look like:
$credential = Get-PnPStoredCredential -Name "PnPDemoCredential" -Type PSCredential
Connect-PnPOnline -Url https://demopnptesttenant.sharepoint.com -ClientId "c5013a05-8a03-4599-7d1f0f4170cc -CertificatePath "c:\temp\PnPDemoCertificate.pfx" -CertificatePassword $credential.Password -Tenant erwinmcm.com
With a ’normal’ use of Connect-PnPOnline you can also make use of the credential manager. No need to retrieve a credential first, just enter the name of the Credential you created in the credential manager as a value for the -Credentials parameter. In that scenario you will of course have to specify a valid username too.
Concluding
Is this easy to set up? No, I don’t think so, but it enables scenarios where an Azure AD admin defines what kind of access you get with a certificate. That same admin can then that access at will, without the developer using the certificate having access to the AD itself. That as such can be a valid use case.