
Multilingual Provisioning Templates with the Office 365 Developer Patterns and Practices Provisioning Engine
Somehow I don’t seem to be able to come up with short titles for my posts :-)
A much requested feature was the ability to create a multi-language provisioning template. It turned out that the implementation of that wasn’t actually that complex, we had much of the plumbing already in place in the engine.
The main question we had to ask ourselves was: how do we specify the various values for each language? We looked into embedding the values into the template itself, but in the end we decided to go for proven grounds and go for resource (RESX) files. This will allow you to send off the file for translation, it allows you to easily reuse the resource files, etc.
So, without further ado, here goes:
- Create a new RESX file in Visual Studio (or, if you insist, create one from scratch in Notepad and write the XML manually). Enter your values:
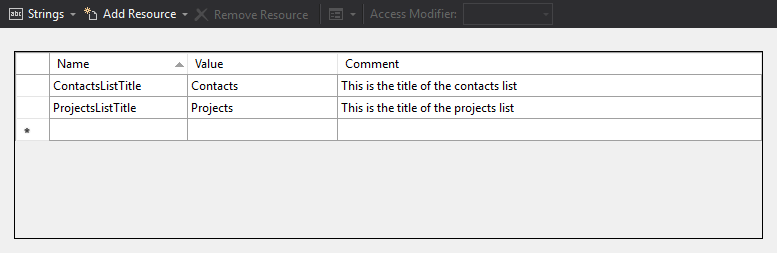 If you don’t have Visual Studio available these are a few alternative tools you could use, just google/bing for “RESX Editor” and a few should pop up.
 - When done creating the resx file, create a copy and translate the values into another language. So you have to create a RESX file for each language you want to support. The filename is not important, but we recommend you to use general naming standard, being
<Filename>-<Language>.resx. E.g. SiteTemplate-en.resx, and SiteTemplate-nl.resx. - Open the provisioning template you created or extracted, and add a new section at the as a child to the
<pnp:ProvisioningTemplate>element, at the same level as the pnp:Template element:
        <?xml version="1.0"?>
        <pnp:Provisioning    xmlns:pnp="http://schemas.dev.office.com/PnP/2015/12/ProvisioningSchema">
            <pnp:Preferences Generator="OfficeDevPnP.Core, Version=2.0.1601.0, Culture=neutral, PublicKeyToken=null" />
                <pnp:Localizations>
                    <pnp:Localization LCID="1033" Name="English" ResourceFile="SiteTemplate-en.resx"/>
                    <pnp:Localization LCID="1043" Name="Dutch" ResourceFile="SiteTemplate-nl.resx"/>
                </pnp:Localizations>
                <pnp:Templates ID="CONTAINER-TEMPLATE-8C075A44E60F4E82B8F013637DB1E654">
                etc. etc.
- Now you can add references to the resource file entries like this:
        <pnp:Templates ID="CONTAINER-TEMPLATE-8C075A44E60F4E82B8F013637DB1E654">
            <pnp:ProvisioningTemplate ID="TEMPLATE-8C075A44E60F4E82B8F013637DB1E654" Version="1">
                <pnp:Lists>
                    <pnp:ListInstance Title="{resource:ContactsListTitle}" Description="Use the Contacts list for information about people that your team works with." DocumentTemplate="" OnQuickLaunch="true" TemplateType="105" Url="Lists/contacts" MinorVersionLimit="0" MaxVersionLimit="0" DraftVersionVisibility="0" TemplateFeatureID="00bfea71-7e6d-4186-9ba8-c047ac750105" EnableFolderCreation="false">
                        <pnp:Views>
              etc. etc.
Notice that the Title attribute in the ListInstance element uses a token: {resource:ContactsListTitle} . During provisioning the engine will retrieve the language of the web you are provisioning to. Based upon that it will know which resource file to use as the entries in the templates have an LCID attribute, which maps to a language. See https://msdn.microsoft.com/en-us/goglobal/bb964664.aspx for an overview of all Locale Ids.
So if the language of the web is English, it will lookup the ContactsListTitle entry in the SiteTemplate-en.resx file. If you provision the same template to a Dutch site, the engine will lookup the entry in the SiteTemplate.nl.resx file.
If you use the OfficeDev PnP PowerShell cmdlets, it is just a matter of storing the resource files in the same folder as the template itself. If you use your own coded solution the engine will retrieve the resource files from the FileConnector you specified.
For your convenience, we support a number of different token identifiers, all doing the same:
{localization:<key>},{localize:<key>},{loc:<key>},{resource:<key>}and{res:<key>}.